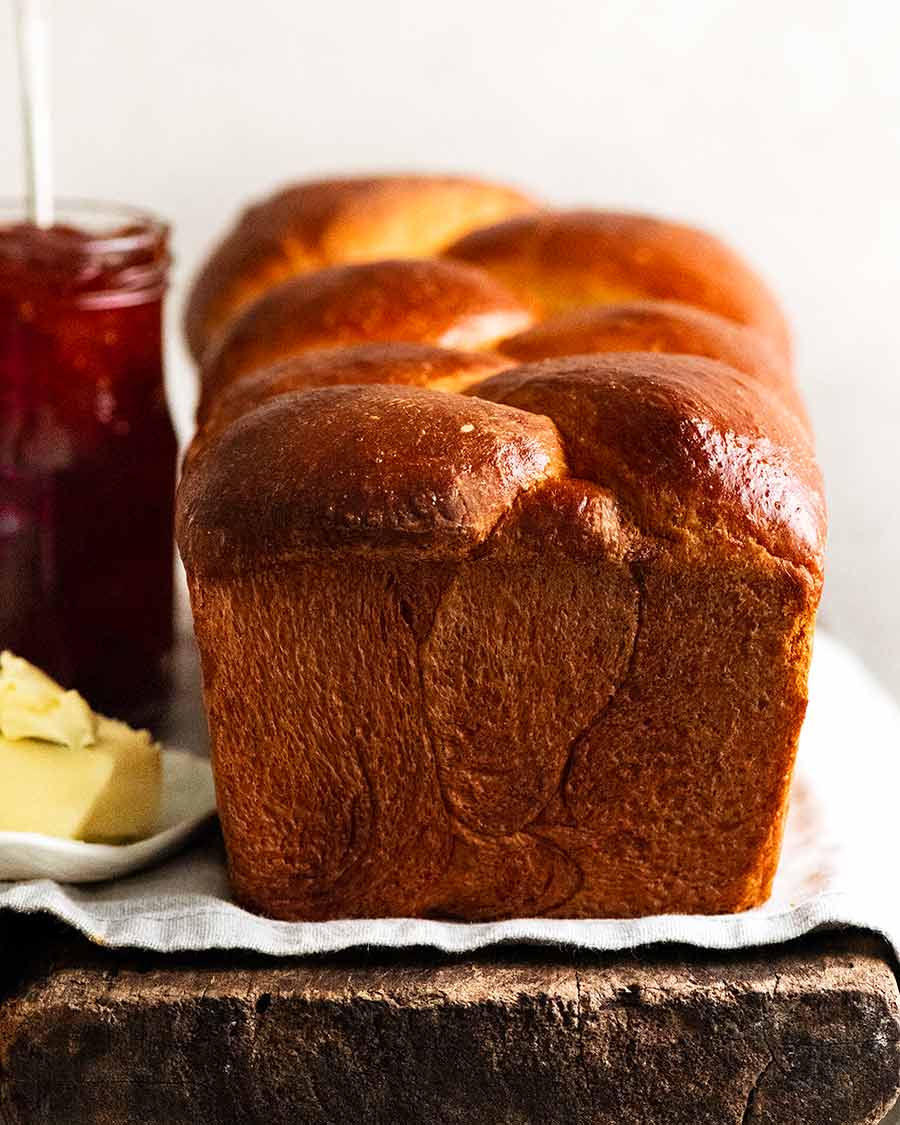
Brioche recipe
If you’ve ever wondered what makes Brioche different from most other breads, the answer is butter. Unsurprising really, given the French origins of this delicious bread! Enrichening bread with butter and eggs is what gives Brioche its croissant-like flavour, its uniquely soft crumb and its signature crust that’s paper-thin and a beautiful, burnished mahogany. Store-bought Brioche is more often than not a pale example of what a great brioche should be like. Store-bought Brioche is not only expensive but more often than not a pale example of what a great brioche should be like. Mass-produced Brioche often skimps on butter for cost reasons for one. It’s also produced without the care needed to bake a truly great brioche. Making your own Brioche on the other hand is not nearly as hard as it sounds and infinitely rewarding. Incomparable taste aside, when you bake your own Brioche, the smells wafting through your house are truly intoxicating. The sweet scent of butter, sugar and toasty bread will instantly teleport you to a cosy bakery in a quaint village with cobblestone streets, somewhere in the French countryside. It’s …. just … magical! So, are you ready to bake the most amazing bread of your life?? Oui? Then let’s do this!!
Source of this Brioche Recipe
For a recipe this iconic I wanted to ensure I did it justice, making it the traditional, real-deal French way. So this homemade Brioche recipe is one I created together with a classically-trained French chef residing right here in Sydney, Jean-Baptiste Alexandre. We created this recipe with wisdom we gleaned from well-respected French cookbooks to arrive at what we think is the best possible Brioche a home cook can make. The notable books we used are:
Larousse Gastronomique;Escoffier’s Le Guide Culinaire; andFrench Patisserie Master Recipes and Techniques from the Ferrandi School of Culinary Arts.
Brioche is an all-day project and worth every second
Let me be upfront: Brioche is not a 30-minute shake-n’-bake job you can whip up after work. Brioche is a project for one of those homebody days when you plan to potter around the house all day doing chores or relaxing. This is because it takes 8 1/2 hours from start to finish:
Making dough: 35 minutes mixing + 10 minutes prep = 45 minutesRise #1: 2 hoursRefrigeration: 1.5 hoursRise #2: 3 hoursBaking: 35 minutesCooling: 45 minutesTOTAL = ~8.5 hours
The vast majority of this time as you can see is in fact completely passive, ie. waiting around – for the dough to mix, proof, rest, bake, cool etc. The active time is actually a tiny proportion of the overall process. And I promise you the end result makes it more than worth the time investment. Brioche truly is the most extraordinary homemade bread I’ve ever made. But make no mistake, it does require commitment!
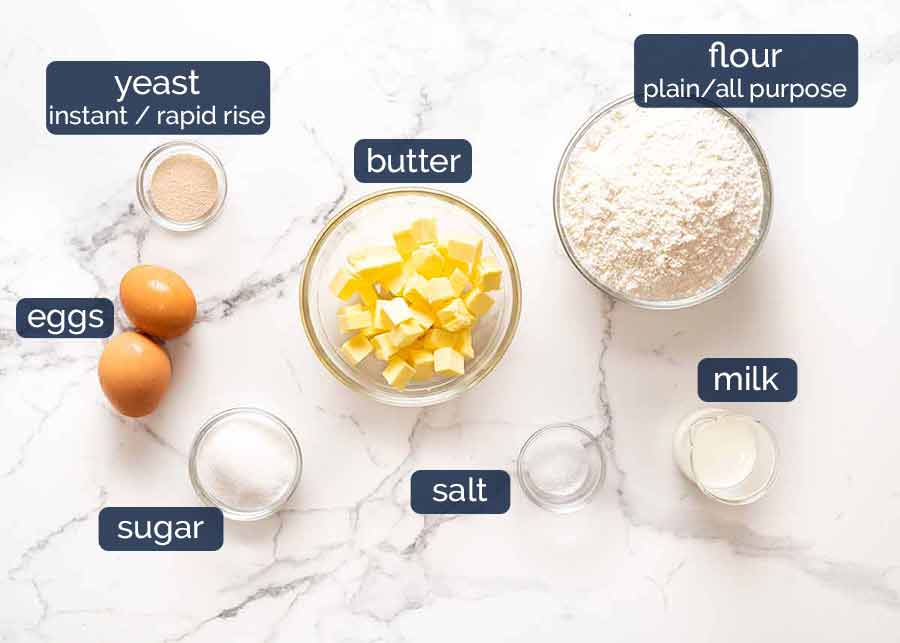
What you need to make Brioche
Other than the fact that there’s a considerable amount of butter called for – unsurprising given the beautiful buttery flavour of this bread – there’s no unusual ingredients at all in brioche. The unique part is in the making!
Plain / all-purpose flour – An interesting fact is that Brioche is fluffier, rises better (about 15% taller) and has a softer crumb when made with plain / all-purpose flour rather than bread flour (ie. high protein flour). The latter typically yields a better result for most breads such as Artisan bread, Naan and Pide, to name a few. Yet not for Brioche. We know because we tested bread flour vs plain flour versions of Brioche side-by-side!Only got bread flour? Brioche is still absolutely worth making. It’s just even better with good old plain flour!Instant / rapid-rise yeast – Instant / rapid-rise yeast is called for in this recipe. The recipe also works with standard active / dry yeast, but the brioche does not rise quite as much and the crumb is not quite as tender.Butter – Lots of it … The amount of butter is significantly more than most breads, and is what gives Brioche its signature intense, buttery flavour. 150g / 10.5 tablespoons of butter to 300g / 2 cups of flour here, which is at least 5 times as much as an average white bread recipe! (High five! 🙌🏼 😂)Softened / room temperature butter is needed. The butter must be softened and not fridge-cold, so it incorporates more easily into the dough. Target a temperature of 20 – 22°C / 68-71.5°F (if you have a thermometer).However the butter must not be so soft that it is melting, otherwise the dough will end up greasy. It should be firm enough so you can pick it up with your fingers but soft enough that you can only just do so, and can squish it fairly easily;Sugar – Brioche is technically a Viennoiserie, a class of rich, sweet breads and pastries that includes Danishes and croissants. The extent of sweetness you encounter in Brioche can vary. For me, I like it on the less sweet side, straddling the line between sweet and savoury. I feel this way it’s not too sweet when spread with say, jam (a traditional French accompaniment for brioche), and still also suitable for savoury foods (eg. for burgers, sliders, breakfast rolls etc);1/2 cup (125 ml) eggs, at room temperature – This recipe very specifically calls for 1/2 cup (125 ml) of eggs which is approximately 2 1/2 eggs. I tried rounding up to 3 (it was too eggy and it dried out the crumb) and rounding down to 2 (the crumb was too loose).So, sorry folks! 2 1/2 eggs it is! A few pointers:– How to measure the eggs out: Just crack 3 eggs into a bowl, whisk, then measure out 1/2 cup (125 ml). We will use the remaining egg for the egg wash, don’t worry! – Use at room temperature: Eggs need to be at room temperature and not fridge-cold, so they incorporate better into the dough. – A quick way to warm up fridge-cold eggs: Place eggs in a large bowl, cover with warm tap water (just warm, not hot) and leave for 5 minutes. Wipe dry (to avoid residual water dripping into bowl), then use per recipe.
How to make Brioche
To make brioche properly, you will need a stand mixer because the recipe calls for 35 minutes of kneading which is what makes brioche rich and buttery, yet an incredibly tender crumb. (Theoretically I suppose kneading by hands is possible, but I can’t begin to imagine how long it will take! You would need to be either a masochist or an Olympic rower … ) Only got bread flour? Brioche is still absolutely worth making. It’s just even better with good old plain flour! Softened / room temperature butter is needed. The butter must be softened and not fridge-cold, so it incorporates more easily into the dough. Target a temperature of 20 – 22°C / 68-71.5°F (if you have a thermometer). However the butter must not be so soft that it is melting, otherwise the dough will end up greasy. It should be firm enough so you can pick it up with your fingers but soft enough that you can only just do so, and can squish it fairly easily; So, sorry folks! 2 1/2 eggs it is! A few pointers: – How to measure the eggs out: Just crack 3 eggs into a bowl, whisk, then measure out 1/2 cup (125 ml). We will use the remaining egg for the egg wash, don’t worry! – Use at room temperature: Eggs need to be at room temperature and not fridge-cold, so they incorporate better into the dough. – A quick way to warm up fridge-cold eggs: Place eggs in a large bowl, cover with warm tap water (just warm, not hot) and leave for 5 minutes. Wipe dry (to avoid residual water dripping into bowl), then use per recipe. Don’t have a stand mixer? Don’t worry! This can be made using a food processor in 5 minutes flat. It rises about 10% less but the results are still exceptional!
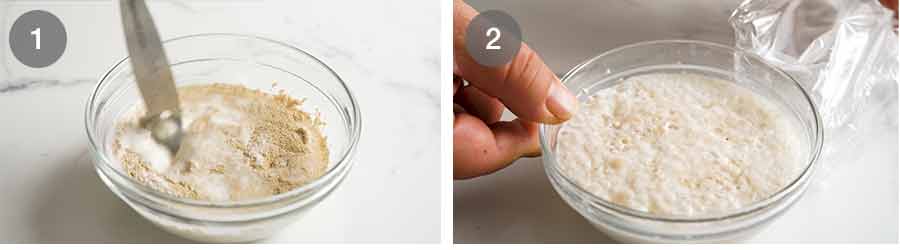
Part 1: Bloom yeast
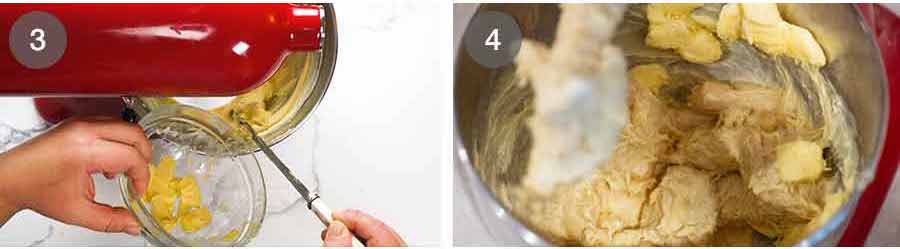
Part 2: Make the dough (it’s super soft!)
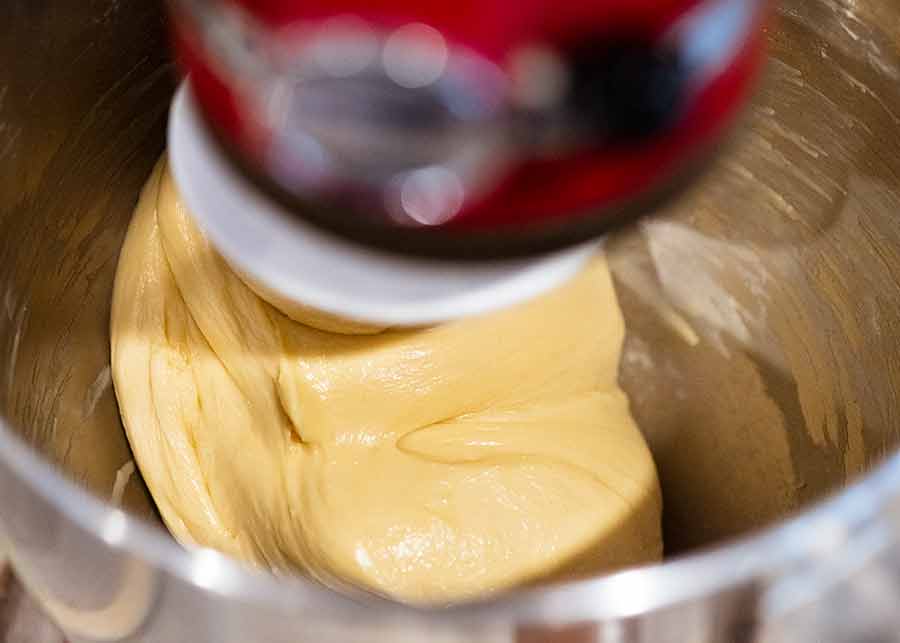
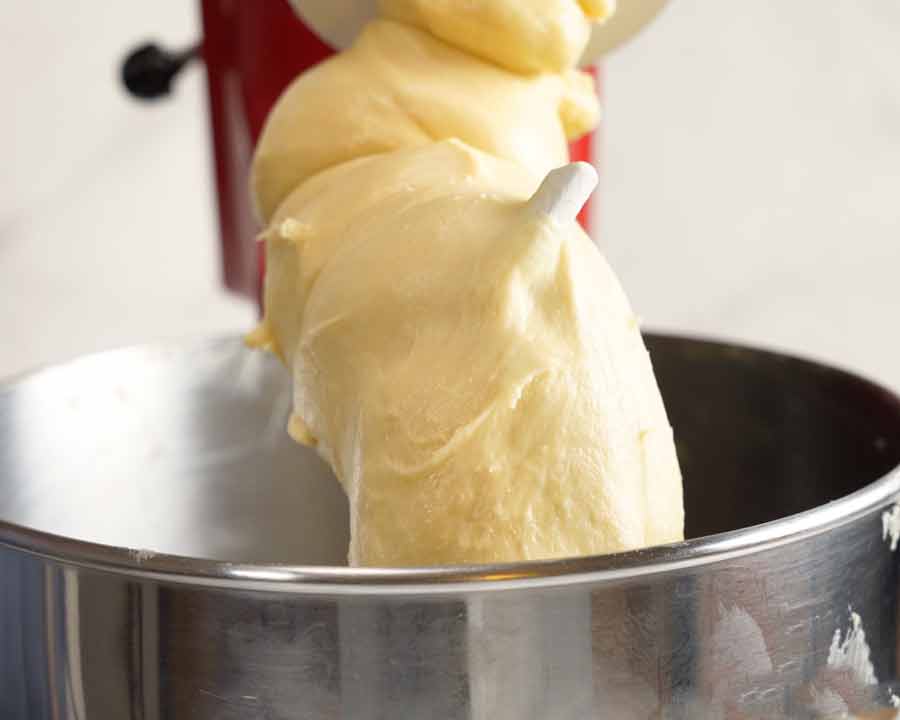
Heads up: Yes really, the dough takes 35 minutes to mix using a stand mixer. It will look like a sticky, unusable paste for the first 25 minutes, and even once ready it will still be a very, very soft dough. Click here to jump to the section explaining why the dough is soft. But when creating the Naan recipe and also Pide, we found that blooming instant yeast in a warm water and sugar solution first makes flatbreads fluffier and softer. The same also applies to brioche. Blooming the yeast first is also a valuable insurance policy to confirm the yeast is alive and well before baking. Imagine setting aside your day to make this Brioche only to find it hasn’t risen because the yeast is dead! 😱 Don’t even go there … ! Next, we add butter: (Click here to read about why it takes this long. In short, it’s because the high amount of butter in this dough inhibits the formation of gluten that occurs when we knead dough which makes breads rise. So we have to knead for much longer than typical breads for the the gluten to form.) What should the dough look like at this stage? Super sticky and pasty, and totally un-dough-like. No way could you knead it with your hands. You’re on the right track!
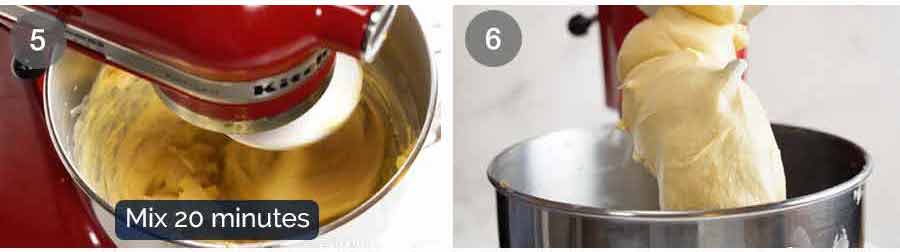
Brioche dough at the beginning (left) and end (right) of mixing:
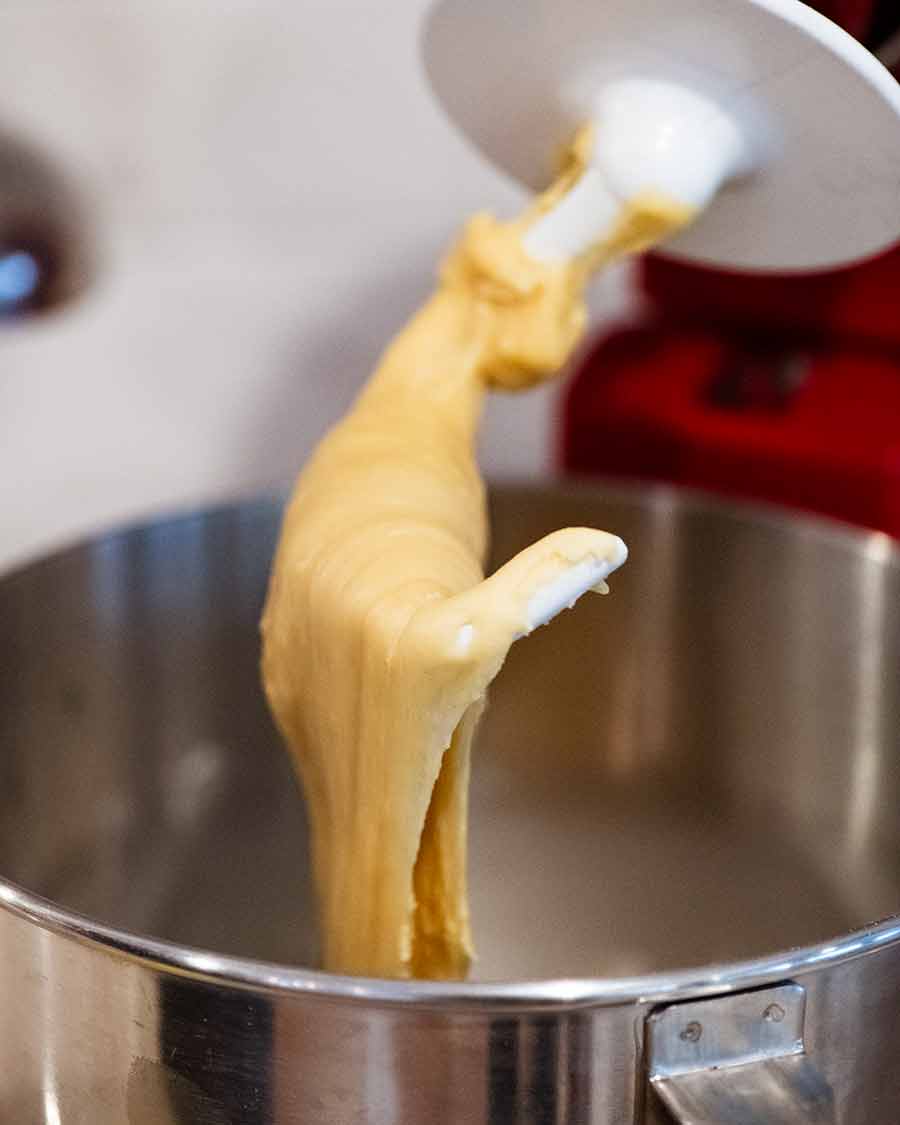
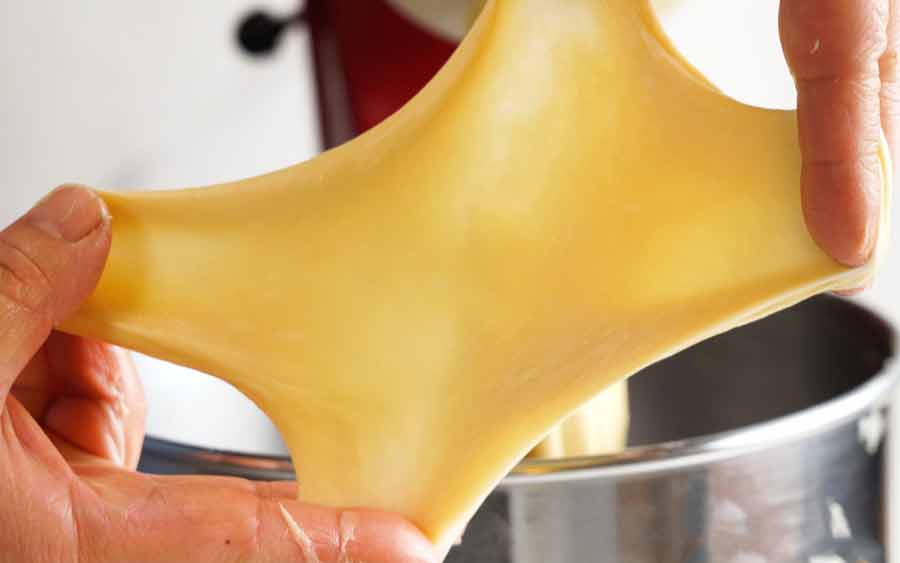
And here’s another photo towards the end of the mixing time. You can see how the dough has come together and come away from the side of the bowl (ie the dough isn’t so pasty it’s stuck all on the bowl). What should the dough look like at this stage? Even stickier and pastier! You may start to doubt me … but have faith! The dough will firm up later to the point we can just handle it after kneading with the stand mixer (see next step). Scrape down the sides of the bowl every now and then, as needed. I do it about 3 times at the beginning of the mixing when the mixture is stuck all over the side of the bowl. Towards the end of the mixing time, the dough will come together and the sides of the bowl will be clean; The “window pane test”: The “window pane” test will tell you if your dough is also sufficiently elastic which means it has been kneaded enough. Take a walnut size piece of dough and stretch out into a thin film using your fingers. If you can see light through it and do this without the dough breaking, then it has been kneaded enough. If not, keep kneading! Sometimes it takes longer to knead the dough, depending on the warmth and humidity of the kitchen. I haven’t pinpointed exact temperatures yet, but generally the hotter a kitchen, the longer the dough takes to knead until ready. 20 minutes is the time it has consistently taken me in a ~21 – 23°C (70 – 73.5°F) kitchen.
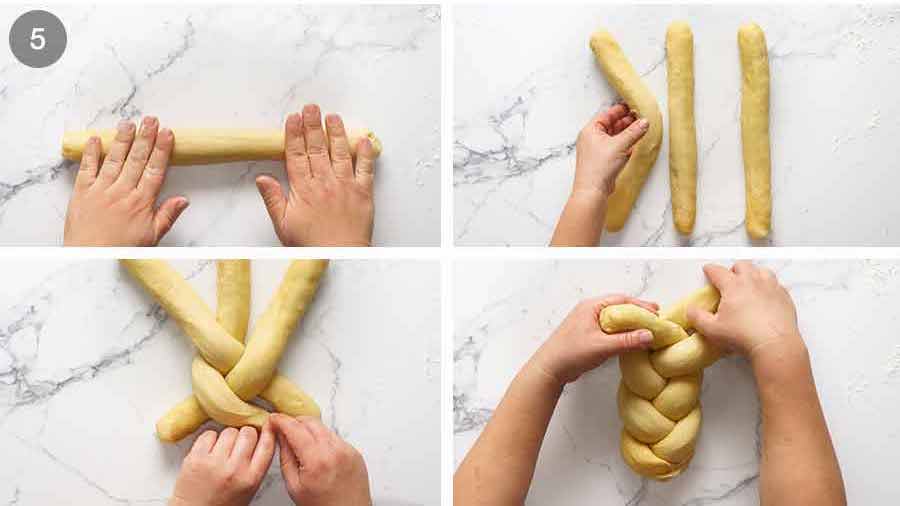
Part 3: Rising and shaping the loaf
Dough made, it’s now time to let it rise and to form the loaf. If this happens, just pop the bowl with the dough in it in the fridge for 15 minutes to chill the butter slightly. Then continue mixing. The same can happen if you take a little too long to braid the dough before baking (warm weather, warm hands = melting butter!) Just pop the dough back in the fridge to let the butter firm up a bit, then continue with the recipe. Now, we’re ready to bake! When seeking a warm place to let the dough rise, remember that the warmer it is, the faster it will rise. Do not put it in direct sunlight. The heat is too strong and will dry out the dough. CHEEKY TIP: Use your dryer! Run it for a few minutes to warm it up, then place the dough in and close the door. It’s a draught-free, warm and cosy environment your dough will love!
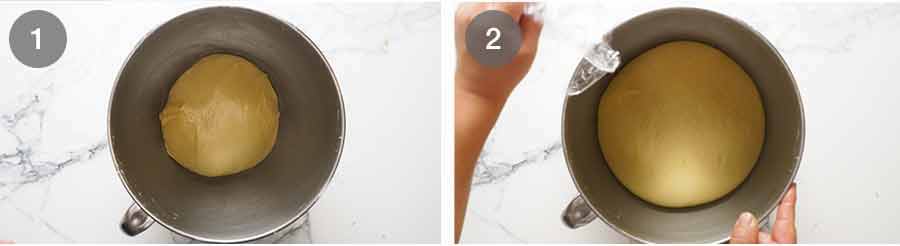
Correctly proofedVisual: Dough has increased in volume according to the description given in the recipe directions. For this recipe, we are looking for doubling in size for Rise #1, and just over double in size for Rise #2.Touch: Gently poke the dough. If the indentation slowly springs back halfway, then it’s proofed and ready for the next step per the recipe.Over-proofedVisual: The dough has risen over the top of the pan and is spilling out over the sidesTouch: Will be balloon-like and inflated. If the indentation remains OR touching the dough causes the dough to deflate, then it’s over proofed.Under-proofedVisual: The dough has not increased to the described volume given in the recipe direction.Touch: If the indentation springs back immediately, the dough is under-proofed.
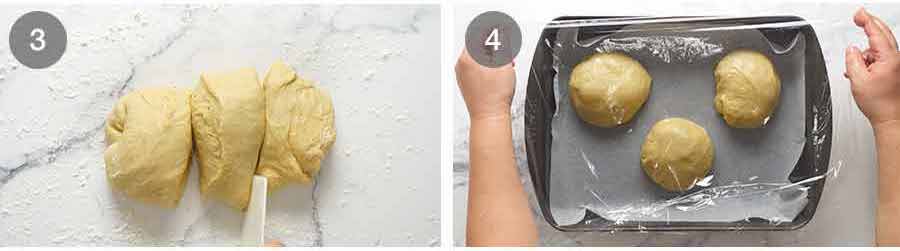
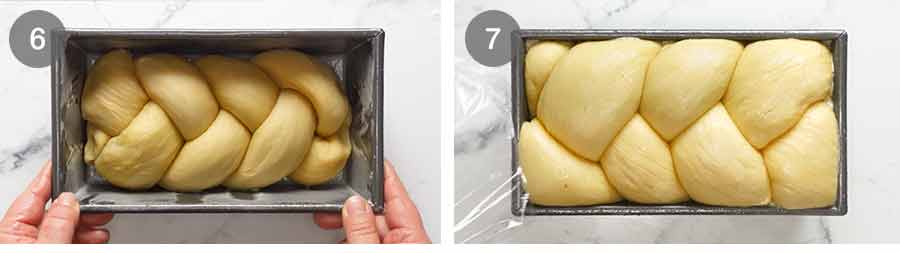
It’s critical to aim for the correct level of proofing for the best result. Over-proofed dough will likely collapse during or after baking, and the crumb will be too loose and crumbly. Under-proofed dough will not rise enough during the bake and the bread will be denser than it should be. This step makes the butter in the dough harden which in turn makes the dough firmer and easier to handle. This makes it easier to shape into a braid and makes the surface of the brioche smoother. It’s an optional step because you can proceed straight onto forming the loaf and Rise #2. If you skip it the inside of the brioche will come out exactly the same, but the surface of the brioche will be slightly more streaky (like the crust of croissants). It’s also a little harder to handle because the dough is very soft. To be honest, I love the crust of brioche that hasn’t been refrigerated because it flakes like croissants. But in pursuit of perfection, I’ve included the refrigeration step! Lightly spray cling wrap with oil, then cover the dough. (Oiling the cling wrap stops the dough from sticking to the cling wrap. If it sticks, it will causes the dough to deflate when you remove the cling wrap.) Different size loaf pans are fine to use, but it will affect the shape/height of the brioche. You can also bake it freeform (ie. just on a tray) but bear in mind it will spread out more so it will be wider than it is tall; This rise takes longer than you might expect because the dough first needs to come to room temperature (ie remove fridge chill) before it starts to warm up and actually rise. Here’s a comparison of before and after rising in the loaf pan:
Part 4: Baking
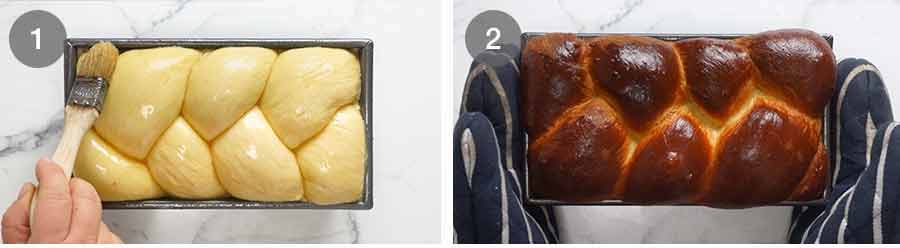
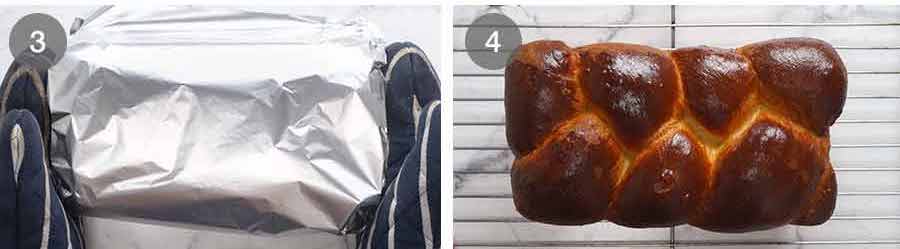
And now for the best part – EATING IT!!! Bake uncovered for 15 minutes at 200°C/390°F (180°C fan). The brioche should be a bronzed, mahogany colour. Cooked internal temperature – The internal temperature of cooked brioche is 88°C/190°F. This is slightly lower than the target temperature of 93-96°C /200-205°F of most breads because it is an enriched dough (ie. high in fat). Lower fat breads have a higher cooked internal temperature. In actual fact, brioche is cooked (done) at 82°C / 180°F but I tend to take it higher as a precaution, having experienced a few too many undercooked brioches when creating this recipe! This internal temperature is still well within the limits that yield moist, tender bread (as you will see in the video); Leave the brioche to cool for at least 45 minutes before slicing (or tearing!) to serve. This is a key step for any bread to allow it to finish cooking inside and settle. If you cut bread as soon as it comes out of the oven, the inside is still doughy and wet. Before we start fawning over our amazing finished brioche though, my work is not done yet. Allow me to geek out a little bit on you on the finer details of this Brioche. If you’re not interested, skip down to the recipe, recipe tutorial video, or … to Dozer!
Brioche recipe: The details
Brioche is a unique bread, and with it comes a unique production process. So in this section, I’m sharing some extra background information pointing out some of the quirks and features of brioche generally as well this recipe specifically. I hope it may interest those of you interested in the why when it comes to baking. 🙂
1. This is a traditional French Brioche recipe – with one exception
This Brioche recipe is a traditional French brioche recipe with the exception of one thing: the yeast. Professional French patisseries and bakeries traditionally make brioche with fresh yeast, which is not readily available to all home cooks. Also, working with fresh yeast calls for capable baking experience. So I’ve chosen to create a brioche recipe made with dry yeast to make this more accessible to home cooks.
2. Butter in brioche: Go big or go home
One thing that puts this brioche recipe firmly in the “authentic French” camp as opposed to most recipes you’ll find on the internet is the quantity of butter used. This recipe calls for 150g / 10.5 tablespoons of butter per 300g / 2 cups of flour which is a ratio of 1:2. Many recipes will call for only around half the butter this recipe uses (1:4 butter to flour) which makes the dough easier to work with (because it’s not as soft as it is in this recipe). On the flip side however, it significantly reduces the richness and buttery flavour of the end result. Butter is the heart and soul of a great brioche. In my humble opinion, if we’re going to all the effort to bake a brioche, let’s do it right!
3. Why does brioche dough have to be kneaded for so long?
Brioche dough takes 35 minutes to form using a stand mixer because of the amount of fat in the dough from the butter and eggs. This means it requires far longer for the gluten to form through the kneading process than regular bread. Brioche dough is called an enriched dough which has higher amounts of fat (butter), sugar and dairy than typical breads. Brioche has around 5 times as much butter as an average white bread recipe! Fat inhibits the formation of gluten which is formed when we knead dough which is required to make breads rise so they’re soft and fluffy. So brioche dough is required to be kneaded for longer than usual to develop the gluten.
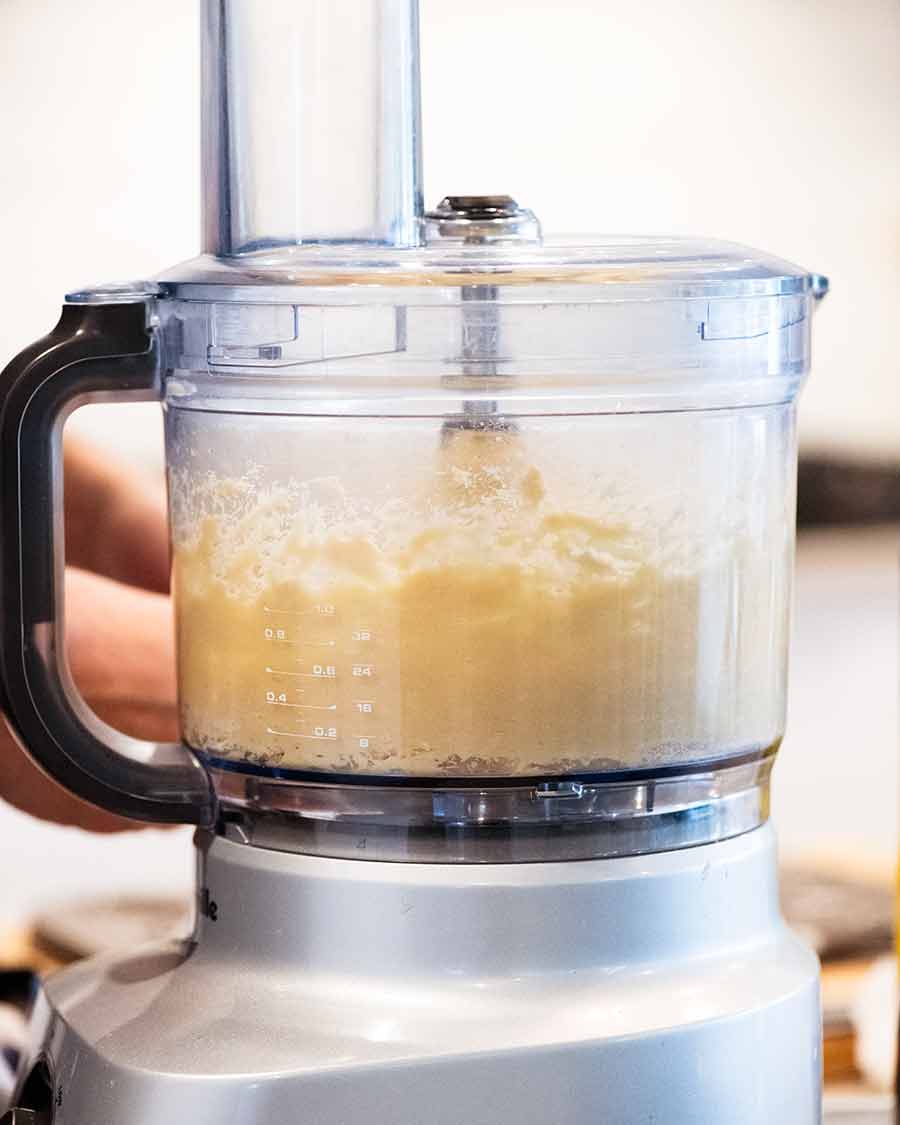
4. No standmixer? No worries.
If you don’t have a stand mixer you can use a food processor instead! It’s also much quicker, taking just 5 minutes flat. Directions in the recipe. The Brioche rises slightly less, but it tastes exactly the same. Below is a visual comparison of the results.
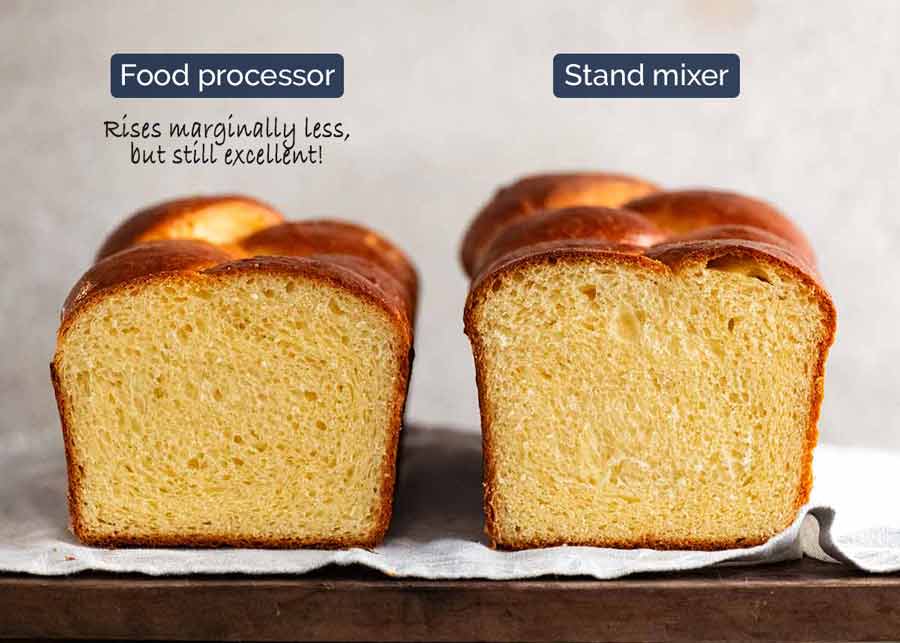
Comparison: Food processor (5 minutes kneading) vs stand mixer (35 minutes kneading)
So why I didn’t share the food processor version as the base recipe if it’s so good? A good question and my answer is this: Brioche is an iconic recipe, one of the great breads in the world. I wanted to show you how it’s made properly and traditionally. The fact remains that the food processor version is not quite as good as making it with a stand mixer because it doesn’t rise quite as well. But the difference is marginal. So given how much time you save, not to mention being an excellent alternative to those of you who don’t have a stand mixer, I fully endorse the food processor method as a perfectly acceptable compromise!
5. “Help! My dough looks too soft! Is this normal?”
Relax. The dough for brioche is much softer than typical bread doughs and this is the secret to the extraordinarily soft crumb of real brioche. In fact, the dough is so soft that for most of the time the dough is being worked in the stand mixer it will have a paste-like consistency. It will be so wet and sticky that it’s impossible to handle because it would just stick to your hands.As you continue to knead the dough in the stand mixer though, the dough firms up. It will come to a point where it can now be handled. It will be smooth and still very soft – much softer than typical bread doughs – but shouldn’t stick to your hands.The dough is also refrigerated partway through the making of the Brioche to aid in shaping by hand before placing into the loaf time, so we get a nice smooth crust. You’ll find “easy” brioche recipes on the internet that have firmer doughs that are easier to work with. But you’ll also find the crumb of those breads isn’t as soft as a real brioche. Yes, we made a LOT of brioche in recent months!!
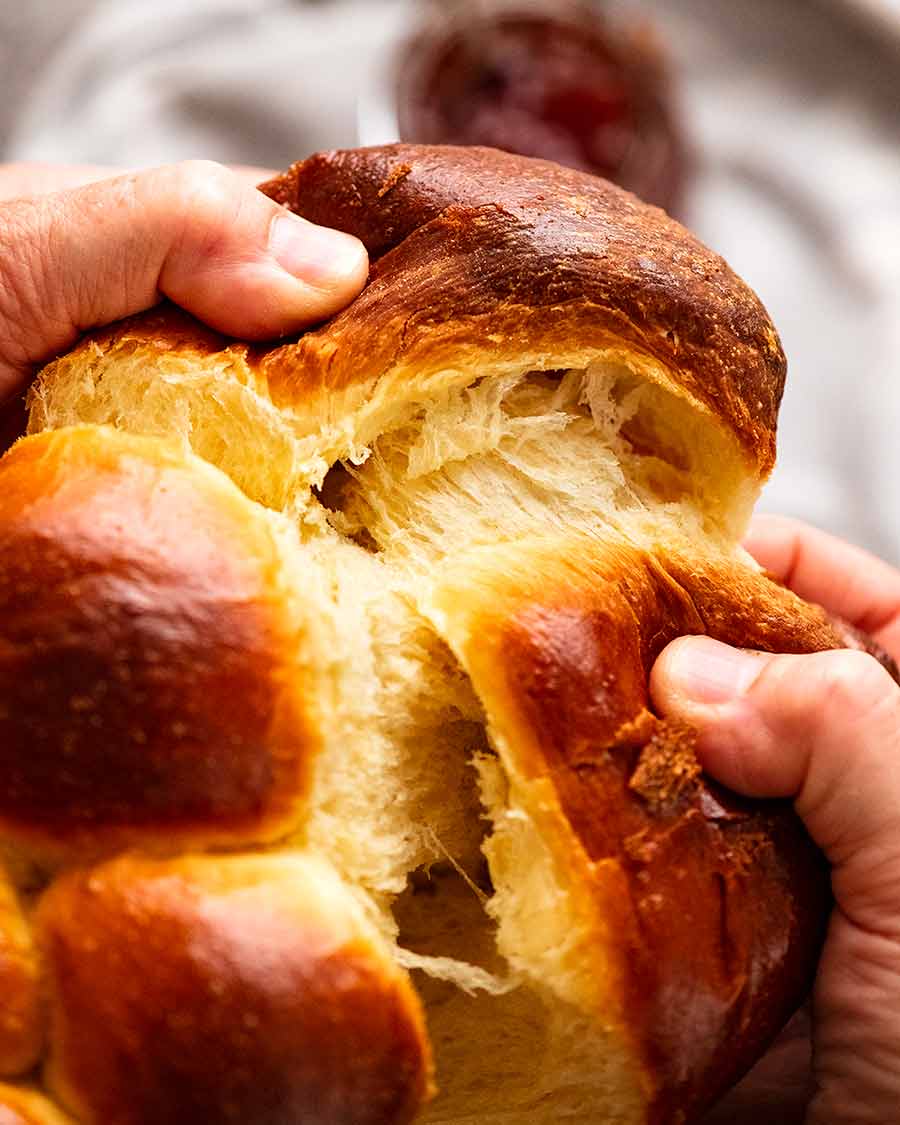
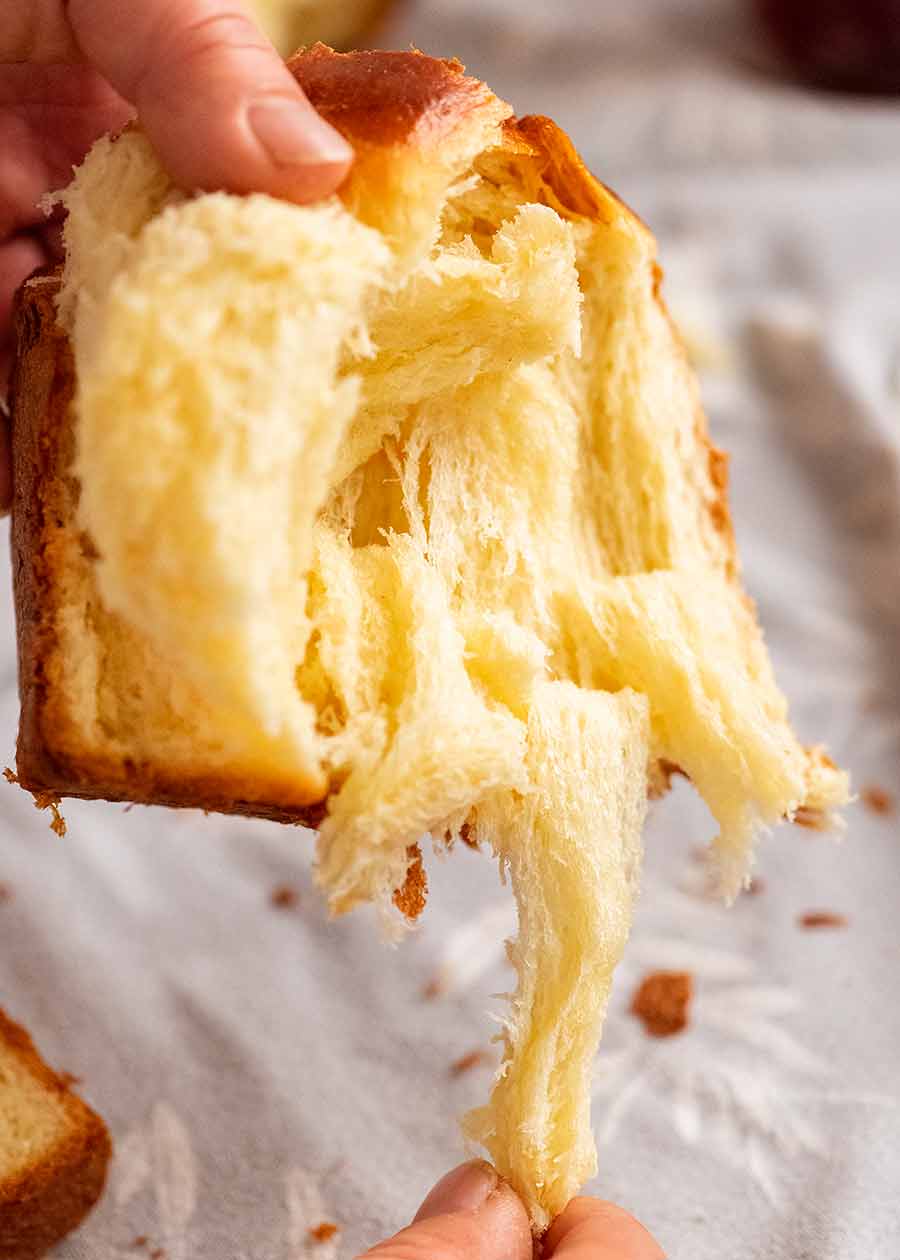
6. Inside a perfect brioche: “Cotton candy” strands
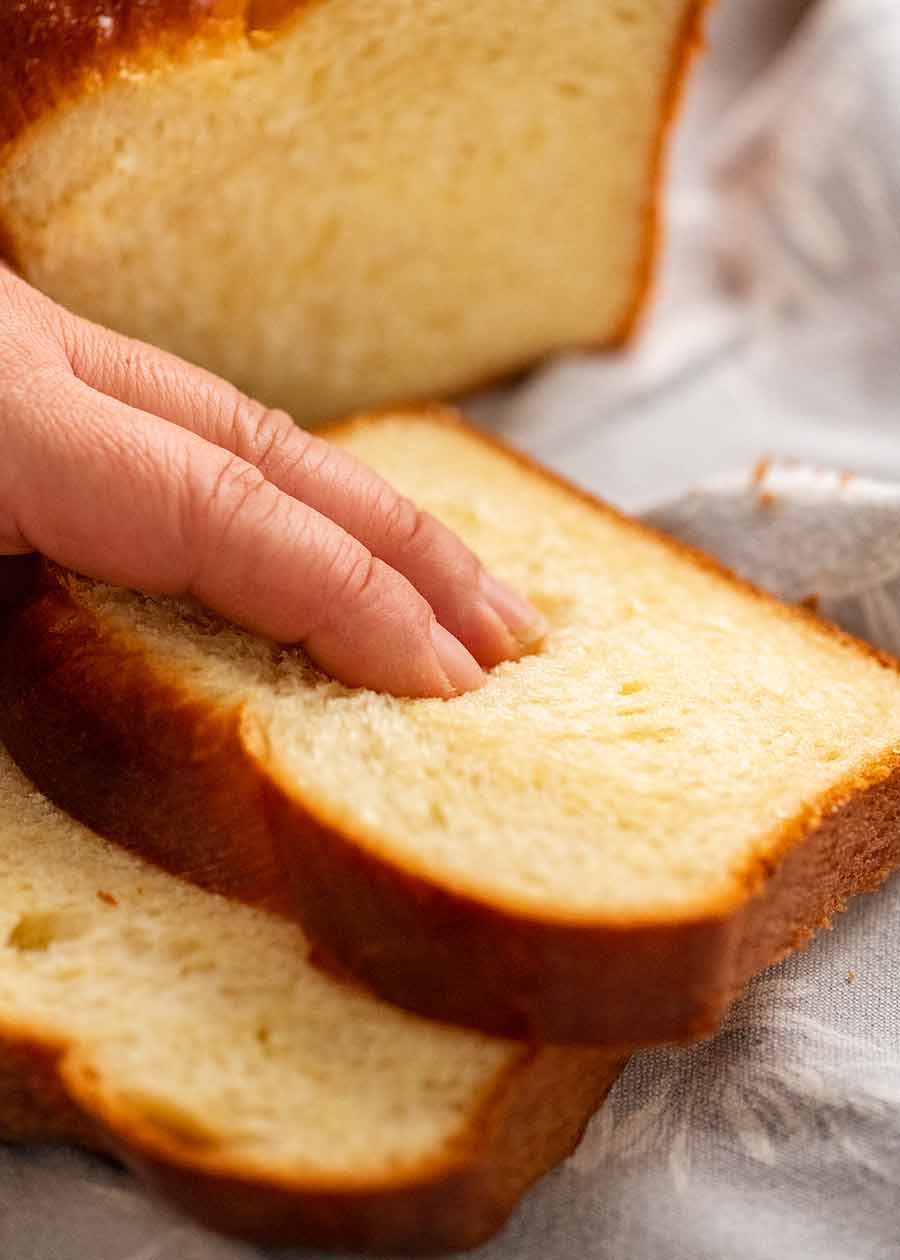
One of the unique qualities of brioche is the texture of the crumb. It has an elasticity similar to soft breads (as you will see in the video when I tear it!), it looks like bread and it slices like bread without crumbling. It is for all intents and purposes, bread. However rather than being chewy, the crumb is soft and giving like cake. Even more enticing is the distinct cotton candy-like strands of the interior that peel away when you tug at them. These strands are truly mesmerising, to both play with and eat! To me, it’s one of the features that makes brioche so special and totally unlike any other bread. Perhaps like popping bubble wrap, it appeals to the inner child within me – I find those strands irresistible!
How to serve Brioche
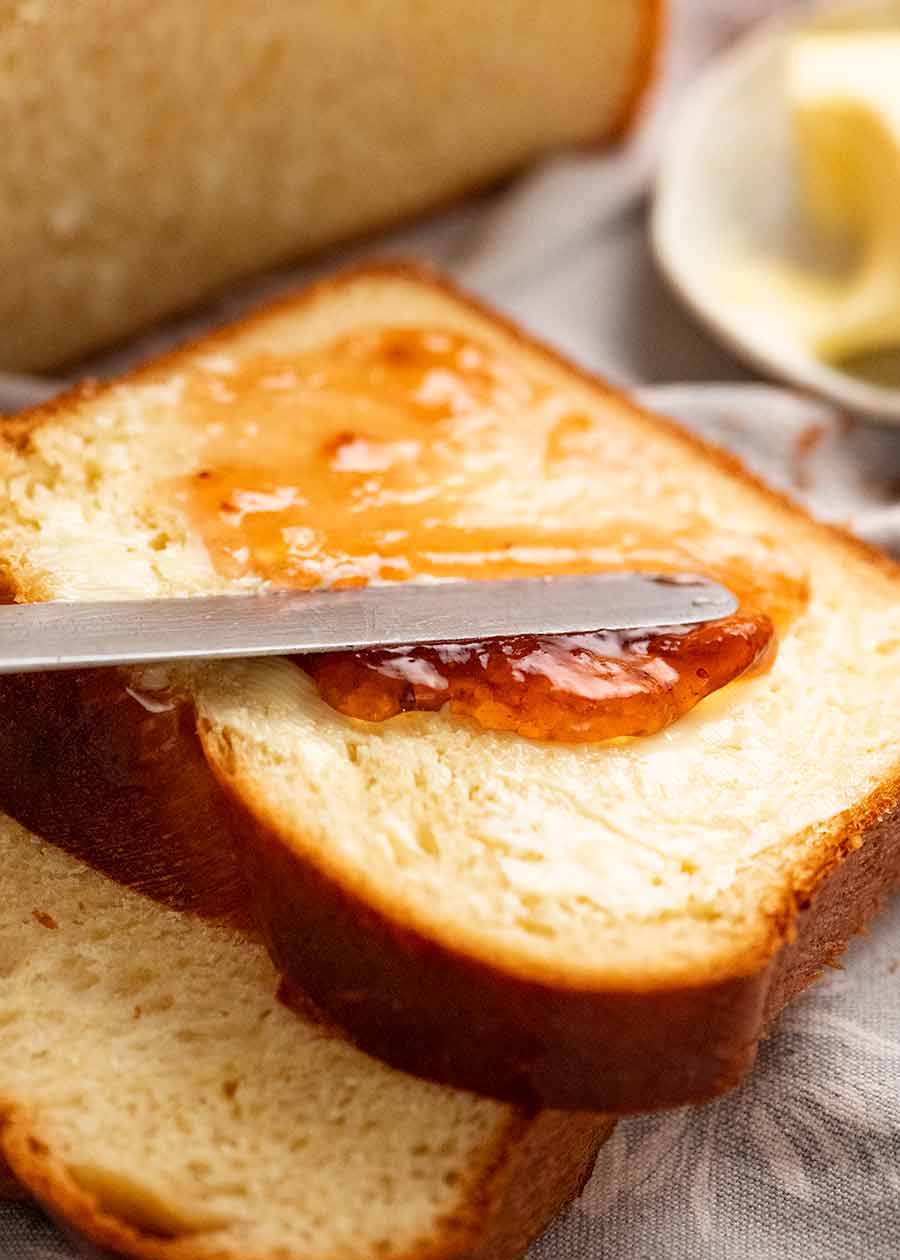
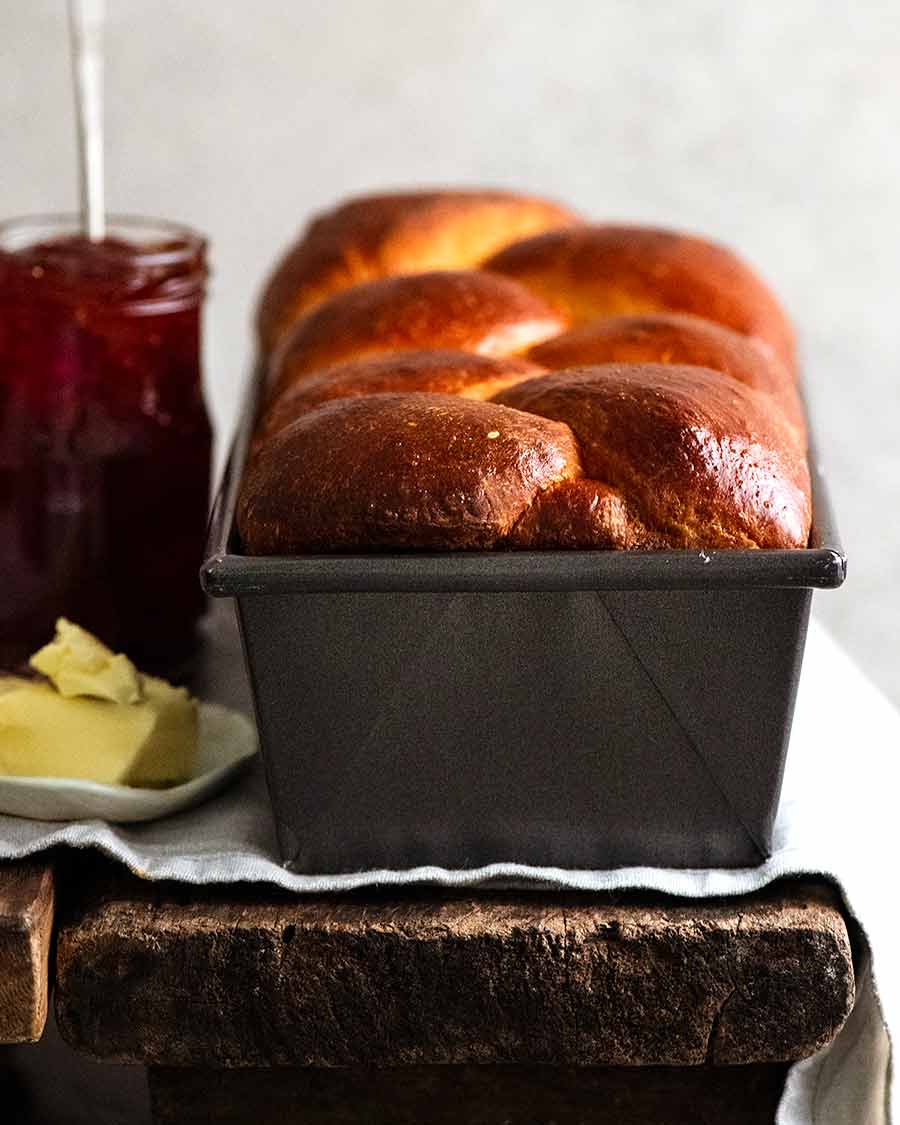
In France, brioche is typically served for breakfast and afternoon tea. Think warm slices of brioche with butter (because, well, you know, there’s just not enough butter in brioche as it is! 😂) and a good smear of homemade jam. Traditional that may be, but in my world the applications of brioche are much broader! Here’s how else I love to use brioche:
Breakfast, morning tea, afternoon tea, and all snacking times in between – Either slices of a warm loaf or toasted and spread with butter and quality jam. I personally find honey too sweet with brioche, but that’s just me …Bread on the side of meals – Apparently this is “not done” in France, I presume because it’s all a bit much. “A bit much” never stopped me though, and nor should it you! Imagine mopping up the garlic butter on a plate of Garlic Prawns or Baked Fish with brioche … Yerrrrrsss!!For sandwiches, sliders, burgers – Brioche buns are all the rage at trendy bistros! Eggs – Topped with scrambled or poached eggs (try it with Eggs Benedict!);The ultimate Bread and Butter Pudding; orThe most incredible French Toast of your life.Serve with chicken liver parfait or smoked fish pâté – a trend you see at nouveau French restaurants these days, instead of crackers or toast.
Basically, anything you will eat with bread will be better if you replace it with brioche! You just can’t go wrong. – Nagi x
Watch how to make it
Classic breads you can make at home
Life of Dozer
Demolition Darby Dozer… in what used to be my house!!